![]()
Sprang
Back to Betha's
Homepage
![]()
Sprang
Wool, linen and silk are all period fibers.
I have used wool (which stuck together and finally broke), hand spun silk
(really nice to work with) and pearl cotton.
Pearl cotton is very easy to work with and economical.
Shed sticks are small dowels that hold your place, allow you to see if you have
made any errors, and help adjust tension and stitch size.
Metal rods such as knitting needles are too heavy and slippery to stay in
place. Wooden Bar B Q skewers work
very well. They are light and rough
enough to be held in place and are very affordable.
The loom must be able to come apart to remove the sprang because the work cannot
be cut off the loom. An easy way to
accomplish this is to have separate sticks attached to the frame that are
removable. Rubber bands will work for this - They are a way of tensioning the
warp to allow for the take up of the thread.
Tie the thread to one side of the stick leaving a long tail.
The final product will determine the length you will want for the tail.
Wrap the thread around each end of the loom in a figure 8 as seen from
the side. Do an even number of
wraps. Adjust the tension so that
it is even through out. Finish by
tying the thread to the same stick as before and leaving a long tail.
When warping, the end thread on the left should be
a back thread and the end thread on the right should be a front thread.
If you want drawstrings it is much easier to insert
them now before you begin working.
Place a stick in the shed formed on the end of the
loom without the knots and push it to the end with the knots.
The stitches should all be evenly spaced and leaning the same direction.
Each back thread must pass under two top threads before it makes the twist with
its working top thread (becoming the new top thread). This is called a 1/1
stitch.
If there is only one top thread you must use the
second back thread (together with the first) to make this first stitch.
This is called a 2/1 stitch. The
first stitch you will make in your project will be a 2/1 stitch.
When an odd thread remains at the end of the row, as it will in a row
that starts with a 2/1 stitch, combine it with the adjacent thread in the same
side of the shed, working the two as one. This
is called a ½ stitch.
The first row of Basic Sprang should be a 2/1
followed by a series of 1/1s and ending with a ½.
The second row of Basic Sprang is all 1/1s.
The third row and every odd row is like the first row.
The 4th row and every even row is like the second row.
Basic Sprang - How To Do It (for right handed people)
Insert the fingers of your left hand in the shed in the same row as the stick
that you pushed all the way to the knots. With
your right index finger pick up 2 threads from the back.
With the same finger push one front thread towards the back.
Pick up another thread from the back and bring it to the front.
Push another thread from the front to the back.
Move your left hand out of the shed as your right hand moves into it.
When you get to the end there will be 2 threads on the front and only one
on the bottom - treat these 2 top threads as one and push them to the back.
Insert 2 sticks into the shed that your right hand
is now holding open. Push one all
the way up and the other all the way down.
You determine stitch size and tension by where the shed sticks are
placed. You should see evenly
spaced stitches that all lean at the same angle running on the top and bottom of
each new shed stick. If they do not
look uniform on the front and back you have a mistake that needs to be fixed.
For the second row, leave the shed sticks in place
and put your left hand in the open shed. Pick
up one thread from the back and bring it to the front.
Push one thread from the front to the back.
Continue to the end and you should finish with a 1/1 stitch.
Put 2 shed sticks in in place of your right hand and push them to the top
and the bottom. All stitches should
look even.
The third row and all odd rows repeat the first
row. The fourth row and all even
rows repeat the second.
Each row of stitches can have their own stick, or
you can reuse sticks from the proceeding rows.
If you are feeling very confident, you dont need to use sticks at all.
Something must be placed in the middle of the finished work to keep it from
untwisting and falling apart. You
can tie a straight piece of string to each side of the work in place of a shed
stick, but that will not allow the fabric to stretch as much.
You can pick up the first thread on a crochet hook
and do single crochet stitches all of the way across.
This was done in period. A
loop of thread needs tied around the last loop to keep it in place.
You can now remove the last of the shed sticks.
Something must be placed through the end loops to
keep it from untwisting and falling apart.
This is more easily done before the twisting work is begun, but a piece
of thread can be run in place along side the starting stick with a blunt needle.
If you wish to sew the sides together to form a
long tube, I find it easier to do while the work is still on the loom.
Start with loose stitches then remove the work from the loom, then
tighten up the sewing stitches.
Instead of pulling and pushing one thread at a time, if you work with two you
will have a much more open mesh (a 2/2 stitch).
If you stagger the rows by starting every other row with a 1/1 (or 2/1 as
the case may be) you will have alternating rows of holes.
Holes can be formed anywhere you wish to place them in 1/1 sprang by doing a ½
stitch followed by a 2/1 stitch.
I find it very handy to have a 5/8 rod in the shed along with or instead of my
left and. It helps me to keep my
place better and I can stop part way through a row if I need to.
It also allows me to work closer to the center of the piece.
I also like to use a crochet hook to pick up threads instead of my
fingers. I used a very long one so
that the entire row of work will fit on it.
How To
Collingwood, Peter. The
Techniques of Sprang Plaiting on Stretched Threads.
New York: Watson-Guptill
Publications 1974. ISBN
0-8230-5220-6.
Kilot, Jules. Sprang Language
and Techniques. Berkeley, CA,
Some Place Publications. 1974.
Second Edition 1979. ISBN
0-916896-03-X.
Skowronski, Hella & Mary Reddy. Sprang
Thread Twisting, A Creative Textile Technique.
New York: Van Nostrand Reinhold Company 1974.
ISBN 0-442-27642-7
Historical Items
Harris, Jennifer ed. Textiles
5,000 Years, An International History and Illustrated Survey.
New York: Harry N Abrams 1993. ISBN
0-8109-3875-8
Useful Internet Sites
www.regia.org/sprang.htm
- borrows extensively from Skowronski
www.duke.edu/~scg3/sprang.html
- basic how to
www.cs.vassar.edu/~capriest/sprangbib.html
- bibliography of sprang
Baroness Betha of Bedford - Helene2@bellatlantic.net

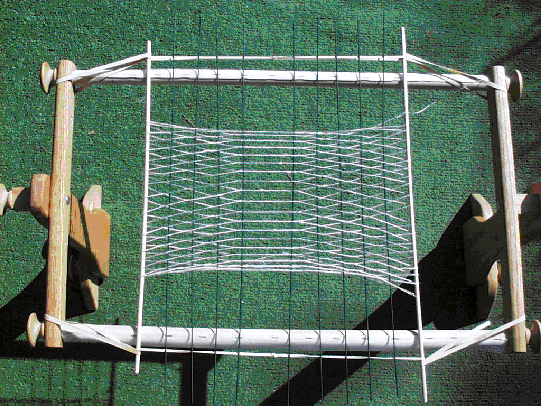
The Loom is warped
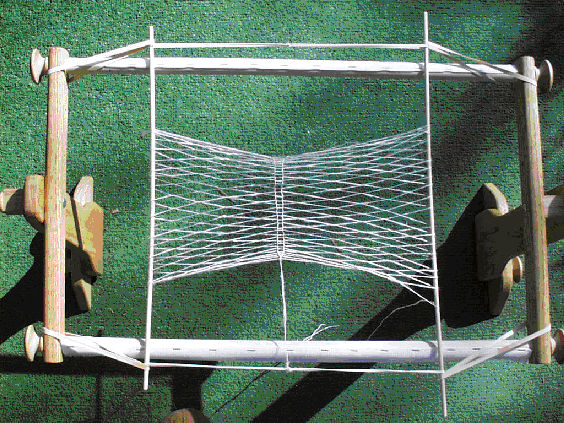
After the weaving has been completed, but before the sticks are removed
After the chain stitch is completed
![]()